Python GUI教程三:布局
发布时间:2019-09-12 08:02:20编辑:auto阅读(2908)
STEP 1:认识布局
- 布局是程序组件在界面上的排布规律,比如我们常看到的退出按钮在一个界面的右上角
- Qt提供了多种布局方式,包括:绝对定位(像素坐标位置)、框布局、网格布局
STEP 2:绝对定位布局
- 绝对定位布局,顾名思义,就是通过给出对象放置在界面上的绝对像素坐标位置来安排界面
# -*- coding: utf-8 -*-


"""
该程序实现一个绝对定位布局器
Author: yooongchun
Time: 2018-05-07
"""

import sys
from PyQt5.QtWidgets import QMainWindow, QAction, qApp, QApplication,QWidget,QLabel
from PyQt5.QtGui import QIcon


# 绝对定位布局

class AbsoLoca(QWidget):
    def __init__(self):
        super().__init__()
        self.initUI()

    def initUI(self):
        lbl1 = QLabel('Hello,it\'s an absolute layout.', self)
        lbl1.move(50, 50)


        self.setGeometry(500, 500, 500, 300)
        self.setWindowTitle('Absolute')
        self.show()

if __name__=="__main__":
    app = QApplication(sys.argv)
    ex = AbsoLoca()
    sys.exit(app.exec_())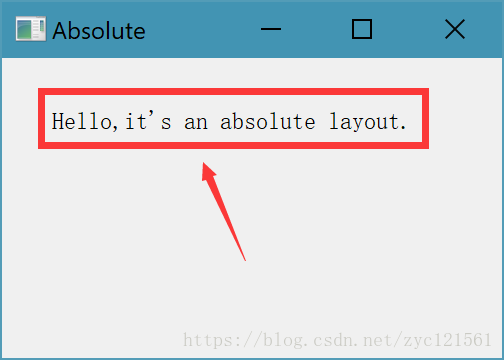
STEP 3:框布局
- 框布局指的是按照你的界面大小让程序组件来自适应水平或者垂直方向的位置及大小
# -*- coding: utf-8 -*-


"""
该程序实现一个框布局器
Author: yooongchun
Time: 2018-05-02
"""

import sys
from PyQt5.QtWidgets import QPushButton, QAction, qApp, QApplication,QWidget,QLabel,QHBoxLayout,QVBoxLayout
from PyQt5.QtGui import QIcon


# 框布局

class BoxLoca(QWidget):
    def __init__(self):
        super().__init__()
        self.initUI()

    def initUI(self):
        okButton = QPushButton("OK")
        cancelButton = QPushButton("Cancel")

        hbox = QHBoxLayout()
        hbox.addStretch(1)
        hbox.addWidget(okButton)
        hbox.addWidget(cancelButton)

        vbox = QVBoxLayout()
        vbox.addStretch(1)
        vbox.addLayout(hbox)

        self.setLayout(vbox)

        self.setGeometry(500, 500, 500, 400)
        self.setWindowTitle('Buttons')
        self.show()

if __name__=="__main__":
    app = QApplication(sys.argv)
    ex = BoxLoca()
    sys.exit(app.exec_())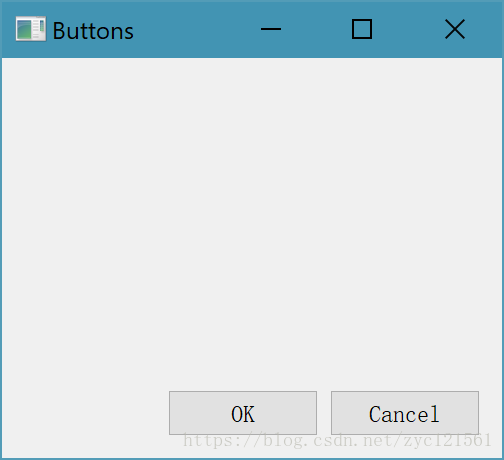
STEP 4:网格布局
- 网格布局将界面按照网格进行划分,然后将组件放置到对应网格中
# -*- coding: utf-8 -*-


"""
该程序实现一个网格布局器
Author: yooongchun
Time: 2018-05-07
"""
import sys
from PyQt5.QtWidgets import QPushButton, QAction, qApp, QApplication,QWidget,QLabel,QGridLayout
from PyQt5.QtGui import QIcon


# 网格布局

class GridLoca(QWidget):
    def __init__(self):
        super().__init__()
        self.initUI()

    def initUI(self):
        grid = QGridLayout()
        self.setLayout(grid)
        names = ['Cls', 'Bck', '', 'Close', '7', '8', '9', '/', '4', '5', '6', '*', '1', '2', '3', '-', '0', '.', '=',
                 '+']
        positions = [(i, j) for i in range(5) for j in range(4)]
        for position, name in zip(positions, names):
            if name == '':
                continue
            button = QPushButton(name)
            grid.addWidget(button, *position)

        self.move(1200, 750)
        self.setWindowTitle('Calculator')
        self.show()
if __name__=="__main__":
    app = QApplication(sys.argv)
    ex = GridLoca()
    sys.exit(app.exec_())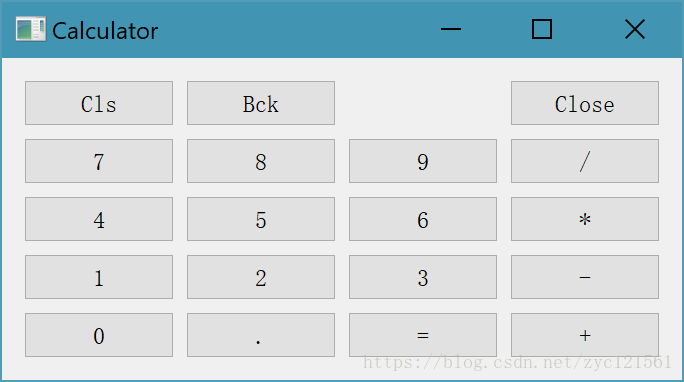
STEP 5:布局复合使用:以上几种布局器可以综合起来一起使用,以设计出更加复杂的界面逻辑
# -*- coding: utf-8 -*-


"""
该程序实现布局器的复合使用
Author: yooongchun
Time: 2018-05-02
"""

import sys
from PyQt5.QtWidgets import QPushButton,QWidget,QLineEdit,QTextEdit, QAction, qApp, QApplication,QWidget,QLabel,QGridLayout
from PyQt5.QtGui import QIcon


# 控件复合使用

class MoreLoca(QWidget):
  def __init__(self):
      super().__init__()
      self.initUI()

  def initUI(self):
      title = QLabel('Title')
      author = QLabel('Author')
      review = QLabel('Review')

      titleEdit = QLineEdit()
      authorEdit = QLineEdit()
      reviewEdit = QTextEdit()

      grid = QGridLayout()
      grid.setSpacing(10)

      grid.addWidget(title, 1, 0)
      grid.addWidget(titleEdit, 1, 1)

      grid.addWidget(author, 2, 0)
      grid.addWidget(authorEdit, 2, 1)

      grid.addWidget(review, 3, 0)
      grid.addWidget(reviewEdit, 3, 1, 5, 1)

      self.setLayout(grid)

      self.setGeometry(500, 500, 1500, 1200)
      self.setWindowTitle('Review')
      self.show()

if __name__=="__main__":
  app = QApplication(sys.argv)
  ex = MoreLoca()
  sys.exit(app.exec_())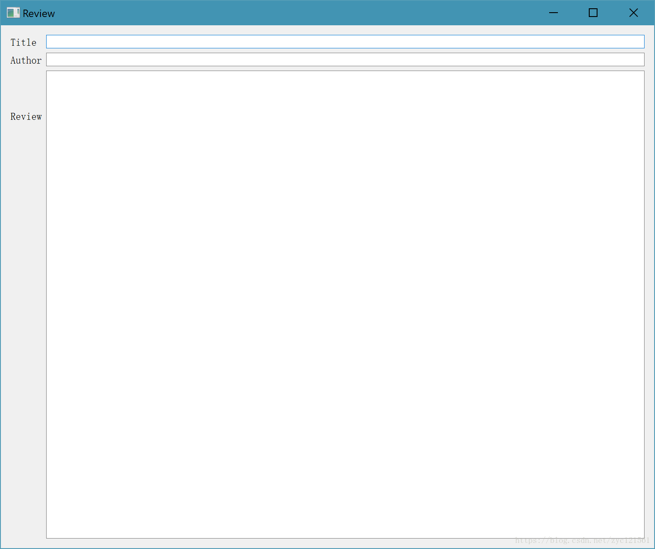
Python GUI 教程三:布局
摘要:这篇文章是Python GUI教程系列的第三篇,将介绍Qt编程中的布局概念及其在Python环境下的实现
如果你英文较好,可以参考这里的文章:http://zetcode.com/gui/pyqt5/
作者:yooongchun
微信公众号:yooongchun小屋

上一篇: python大批量读写.doc文件的解决
下一篇: Python Thrift示例
- H3C基本命令大全
53082
- H3C IRF原理及 配置
40006
- Python exit()函数
34390
- python全系列官方中文文档
30140
- python 获取网卡实时流量
25038
- 1.常用turtle功能函数
24837
- python 获取Linux和Windows硬件信息
23214
- 天天基金网数据接口
16689
- Selenium使用代理IP&无头模式访问网站
14849
- Selenium&Pytesseract模拟登录+验证码识别
14342
- LangGraph Studio可视化
670°
- LangSmith开发-应用入门
632°
- LangGraph开发-多轮对话问答机器人
687°
- LangGraph开发-条件分支/循环图实战
711°
- LangGraph开发-生态介绍,入门demo实战
757°
- LangChain-接入12306-HTTP MCP智能体
886°
- LangChain接入自定义爬虫-MCP工具
851°
- LangChain接入Filesystem-MCP工具
871°
- LangChain搭建MCP服务端和客户端流程
968°
- LangGraph与MCP技术概述
888°
- 姓名:Run
- 职业:谜
- 邮箱:383697894@qq.com
- 定位:上海 · 松江